Advanced Use
Root file system template
We shall go deeper in the source tree and explain the structure. Previously you built the skeleton example, which made use of files in the directories below:├─ apps
├─ images
├─ platform
│ ├─ default (6)
│ ├─ raspi_b_revx (3)
│ ├─ raspi_x_revx (5)
│ └─ skeleton (1)
└─ util
The skeleton inheritance chain:
skeleton →
raspi_b_revx → raspi_x_revx → default
(1)
→ (3)
→ (5)
→ (6)
Lets expand skeleton (1) and
raspi_b_revx (3):
├─ apps
├─ images
├─ platform
│ ├─ default (6)
│ ├─ raspi_b_revx (3)
│ │ ├─ fs-template (4)
│ │ │ └─ etc
│ │ │ └─ rc.raspi_b_revx
│ │ └─ Rules.mk
│ ├─ raspi_x_revx (5)
│ └─ skeleton (1)
│ └─ Rules.mk (2)
├─ Rules.mk
└─ util
We can see skeleton (1) is almost empty. A small recipe Rules.mk (2) is all what's in there. Going to next inheritance level raspi_b_revx (3) we find another recipe and a "fs-template" (4) directory. It's a template of the final target root file system. Every product and board in the inheritance chain may optionally contain one and they all contribute to the end result as a whole. The raspi_b_revx (3) filesystem template is very small. The single file will end up as /etc/rc.raspi_b_revx in the final target file system. Expanding next inheritance level raspi_x_revx (5):
├─ apps
├─ images
├─ platform
│ ├─ default
│ ├─ raspi_b_revx (3)
│ ├─ raspi_x_revx (5)
│ │ ├─ busybox-1.22.1.config
│ │ ├─ crosstool-ng-1.18.0.config
│ │ ├─ linux-rpi-3.10.y.config
│ │ ├─ wpa_supplicant-2.1.config
│ │ ├─ fs-template
│ │ │ └─ etc
│ │ │ ├─ autofs
│ │ │ ├─ auto.master
│ │ │ ├─ auto.sdcard
│ │ │ ├─ bftpd.conf
│ │ │ ├─ fstab
│ │ │ ├─ group
│ │ │ ├─ inetd.conf
│ │ │ ├─ inittab
│ │ │ ├─ issue
│ │ │ ├─ issue.net
│ │ │ ├─ ld.so.conf
│ │ │ ├─ mdev.conf
│ │ │ ├─ modprobe.conf
│ │ │ ├─ modules
│ │ │ ├─ nsswitch.conf
│ │ │ ├─ ntpd.conf
│ │ │ ├─ passwd
│ │ │ ├─ profile
│ │ │ ├─ protocols
│ │ │ ├─ rc.runonce
│ │ │ ├─ rc.syshalt
│ │ │ ├─ rc.sysinit
│ │ │ ├─ release
│ │ │ ├─ services
│ │ │ ├─ shells
│ │ │ ├─ termcap
│ │ │ ├─ udhcpc.script
│ │ │ └─ wpa_supplicant.conf
│ │ └─ Rules.mk
│ └─ skeleton (1)
├─ Rules.mk
└─ util
This tree is a lot bigger. First is a number of *.config files. They contain the settings for a number of applications in the final product. (Inheritance may override a .config deeper down the chain.) Everything in raspi_x_revx/fs-template/etc will end up "as is" in the final product /etc file system.
Remote start
Easily run commands remotely in the target during development. Here is an example of starting the Hello World application in a specific target, given by its Ethernet MAC address. (The target must be connected to the same local subnet as your PC.)
Probing for a target on nerby network.........
Hello World
The Collatz Conjecture returned 1 in 197 loops
$ make ssh b8:27:eb:07:a6:b2 /sbin/logread # Show target syslog
Probing for a target on nerby network.........
[0.545167] Serial: AMBA PL011 UART driver
[0.545442] bus: 'amba': add driver uart-pl011
[0.545526] bus: 'amba': driver_probe_device:
matched device dev:f1 with driver uart-pl011
[0.545553] bus: 'amba': really_probe: probing driver
uart-pl011 with device dev:f1
[0.545881] dev:f1: ttyAMA0 at MMIO 0x20201000
(irq = 83) is a PL011 rev3
[0.879054] console [ttyAMA0] enabled
[0.882766] device: 'ttyAMA0': device_add
[0.883642] driver: 'dev:f1': driver_bound: bound
to device 'uart-pl011'
[0.883689] bus: 'amba': really_probe: bound
device dev:f1 to driver uart-pl011
Autostart at boot
When you have created a custom application you probably want it to always start up automatically when the system boots. The simplest method is to add a shell script in /etc having a name identical to the product name. Example:
$ echo "start-stop-daemon -bSx /opt/my-app"
>>nard/platform/my_product/fs-template/etc/rc.my_product
$ make
$ make upgrade
The script nard/platform/my_product/fs-template/etc/rc.my_product will be executed at boot. Additionally there is a "autostart at network" as well; programs in /etc/network/if-up.d/ are started when a network interface becomes ready.
Scheduled start
Some automated work are often needed once a day. Cron is setup to execute all programs in /etc/cron.daily/ every night. For example, if you create backups, here is the place to initialize them.
The cross compiler
An ARM cross compiler tuned for the Raspberry Pi processor is included in Nard. Generally one need to add the path to it though in Makefiles. When you write new Makefiles, add something like CC="$(PATH_CROSS_CC)gcc" as and argument to make.
├─ apps
│ └─ wireless_tools
│ └─ Makefile ← Peep this and copy how CC is being set
├─ images
├─ platform
└─ util
When you need to manually invoke other parts of the toolchain, for instance GDB or objdump, they are conveniently located in nard/util/bin. You may add at path to it.
nard
├─ apps
├─ images
├─ platform
└─ util
└─ bin
├─ nard-addr2line
├─ nard-ar
├─ nard-as
├─ nard-c++
├─ nard-cc
├─ nard-g++
├─ nard-gcc
├─ nard-gdb
├─ nard-objcopy
├─ nard-objdump
├─ nard-readelf
└─ nard-strip
Debugging
If your program behaves badly it can be debugged remotely with the bundled GDB/Insight debugger. Nard has debugsymbols enabled pretty much everywhere to ease troubleshooting, not just inside of your application but anywhere in userspace. We shall verify it's working by launching the Hello World program in a debug session. GDB/Insight will run in your local PC and communicate with the target (via network) where the program is executing.
$ make upgrade # Push image to target
$ make gdb /usr/bin/hello # Start prog. via SSH. Will "block"
# Open another terminal window
$ cd /your/path/nard/
$ util/bin/nard-insight -x apps/hello/gdbinit # Launch debugger
There is a "command" file
(gdbinit) in the
Hello World source directory we
tell GDB to execute and it
contains all the settings necessary to configure
GDB for a Raspberry target.
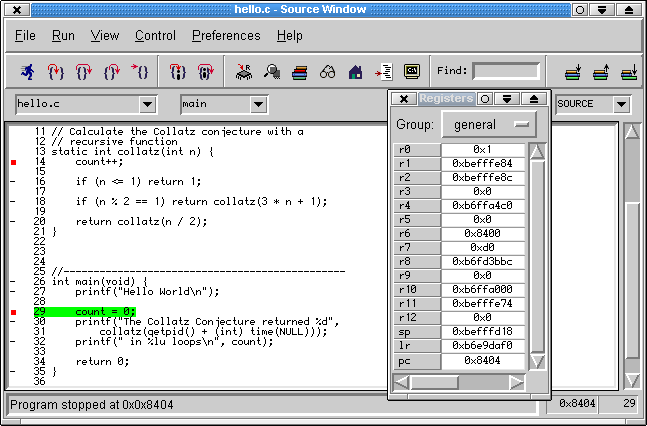 The bundled Insight graphical debugger
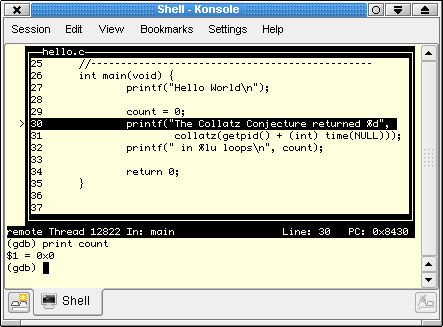
The bundled classic GDB
Kernel configuration
If the standard kernel configuration doesn't fit your needs here is a simple way to modify it (prior experience is assumed).
$ cd apps/linux-kernel/
$ make menuconfig # Modify and then exit as usual
$ cd ../../
$ make # Re-build with new kernel conf
$ make upgrade # Upload to nearby target
Your custom kernel .config end up in
platform/skeleton/linux-rpi-3.10.y.config
where it will override the default.
BusyBox configuration
If the standard BusyBox configuration doesn't fit your needs it to can be customized as the kernel above.
$ cd apps/busybox/
$ make menuconfig # Modify and then exit as usual
$ cd ../../
$ make # Re-build with new BusyBox conf
$ make upgrade # Upload to nearby target
Your custom BusyBox .config end up in
platform/skeleton/busybox-1.22.1.config
where it will override the default.
The serial port
Does your project involve a sidekick microcontroller such as Arduino, PIC or AVR? Then you might need to dedicate the built in serial port (UART) for IPC RS-485 communication. Usually the serial port is a Linux console where one can monitor boot messages and login with a password, but embedded systems often has other uses for it. There is an example product available which has all the necessary modifications done to free up the serial port. The consoleserver product turns the Raspberry Pi into a classic terminal/console server where the serial port can be reached via TCP/IP. Run telnet from your PC (to the Pi) and start read/write the port.
$ make consoleserver
$ make upgrade # Upload to nearby target
$ telnet 192.168.xx.yy 10000 # Access Pi UART from PC
There are many guides on the net for how to free up the serial port, but most of them lacks the information that the kernel needs a patch as well. The consoleserver recipe has a reference to such a patch so ensure not to miss it if copying the product. The port becomes /dev/ttyAMA0 and there is a good HOWTO for how to program it.
The essential parts of the tree for using the built in serial port for other means than as a console:
├─ apps
├─ images
├─ platform
│ └─ consoleserver
│ ├─ fs-template
│ │ └─ etc
│ │ ├─ inittab
│ │ ├─ rc.consoleserver
│ │ └─ ser2net.conf
│ ├─ firmware-template
│ │ ├─ cmdline.txt
│ │ └─ config-consoleserver.txt
│ ├─ Rules.mk
│ └─ linux-rpi-3.10.y.config
└─ util
USB memory stick
Do you need large storage or frequent writes to a database? Then use of a USB disk is recommended alongside the SD card. Nard automatically mounts the first USB disk at /mnt/usbdisk/ on access and later unmounts is when it becomes unused.
Firewall
Nard has a decent network security firewall (iptables), but it's disabled by default for ease of use during development. Enable it by adding this line to your product recipe:
The policy rules are in
nard/platform/raspi_x_revx/fs-template/etc/network/if-pre-up.d/firewall
If you need to extend them; add a custom file
nard/platform/my_product/fs-template/etc/network/if-pre-up.d/firewall
to override the default.
Password
The default credentials should always be replaced. The proper way to do this is by overriding /etc/passwd via inheritance in your custom product. Generate the override file by first logging in to the target, set a new password with standard tools and finally copy the modified password store back to your build PC like this:
$ passwd
Changing password for root
New password: ****
$ exit # Logout, back to PC
$ make download /etc/passwd platform/my_product/fs-template/etc/
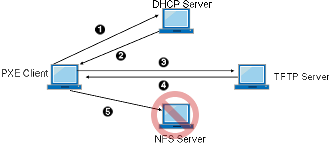
Network boot
Get rid of the SD card entirely by PXE network booting! Thanks to Nard by design run entirely from RAM, it's a perfect fit for network booting. Unlike competing distros, not even NFS-root is required. Thus a glitch in the network, which normally create hiccups in NFS-rooted devices, has no impact on Nard. The Pi model 3B+ offers the best net boot experience, with out-of-the-box support.
|
| Nard deprecates NFS |
There are two prerequisites. A DHCP server which informs the Pi of where to download binarys from and a TFTP server to hand out those binarys. The Raspberry Pi foundation has a tutorial for setting this up with Dnsmasq. Below however alternatives are used:
Example config for the common ISC DHCP server:hardware ethernet b8:27:eb:xx:yy:zz;
next-server 192.168.x.x;
option tftp-server-name "192.168.x.x";
filename "bootcode.bin";
option bootfile-name "bootcode.bin";
always-broadcast false;
option vendor-class-identifier "PXEClient";
option vendor-encapsulated-options
52:61:73:70:62:65:72:72:79:20:50:69:20:42:6f:6f:74:20:20:20;
}
disable = no
socket_type = dgram
protocol = udp
user = root
group = nogroup
wait = yes
server = /usr/sbin/in.tftpd
server_args = -t 4 -v -B 1464 -u nobody -s /var/lib/tftpd
log_type = SYSLOG daemon info
log_on_success += HOST
log_on_failure += HOST ATTEMPT
cps = 1000 5
per_source = 100
instances = 20
}
├─ 1122aabb
│ └─ settings # Config unique for Pi ID 1122aabb
│ ├─ hostname
│ └─ nodeid
├─ settings # Shared among all Pi
│ ├─ network
│ └─ rc.local
├─ overlays
│ └─ i2c-mux.dtbo
├─ config.txt
├─ start.elf
├─ bootcode.bin
└─ zImage